SwipeView
API Reference: UI.SwipeView
Basics
SwipeView is a view that holds a page list inside so that users can traverse those pages via swiping over.
onLoad method of a SwipeView's page is triggered when swipe occurs on Android. On iOS, onLoad method of all pages are triggered at the beginning.
The components in the example are added from the code for better showcase purposes. To learn more about the subject you can refer to:
Adding Component From CodeAs a best practice, Smartface recommends using the WYSIWYG editor in order to add components and styles to your page or library. To learn how to use UI Editor better, please refer to this documentation
UI Editor Basics- Sample
- Sample 1
- Sample 2
- Sample 3
import PageSampleDesign from "generated/pages/pageSample";
import { Route, Router } from "@smartface/router";
import { styleableComponentMixin } from '@smartface/styling-context';
import Application from "@smartface/native/application";
import Label from "@smartface/native/ui/label";
import SwipeView from "@smartface/native/ui/swipeview";
import Sample1 from "pages/sample1";
import Sample2 from "pages/sample2";
import Sample3 from "pages/sample3";
class StyleableSwipeView extends styleableComponentMixin(SwipeView) {}
class StyleableLabel extends styleableComponentMixin(Label) {}
//You should create new Page from UI-Editor and extend with it.
export default class Sample extends PageSampleDesign {
swipeView: StyleableSwipeView;
labelState: StyleableLabel;
constructor(private router?: Router, private route?: Route) {
super({});
}
// The page design has been made from the code for better
// showcase purposes. As a best practice, remove this and
// use WYSIWYG editor to style your pages.
centerizeTheChildrenLayout() {
this.dispatch({
type: "updateUserStyle",
userStyle: {
flexProps: {
flexDirection: 'ROW',
justifyContent: 'CENTER',
alignItems: 'CENTER'
}
}
})
}
onShow() {
super.onShow();
const { headerBar } = this;
Application.statusBar.visible = false;
headerBar.visible = false;
}
onLoad() {
super.onLoad();
this.centerizeTheChildrenLayout();
this.swipeView = new StyleableSwipeView({
page: this,
pages: [Sample1, Sample2, Sample3],
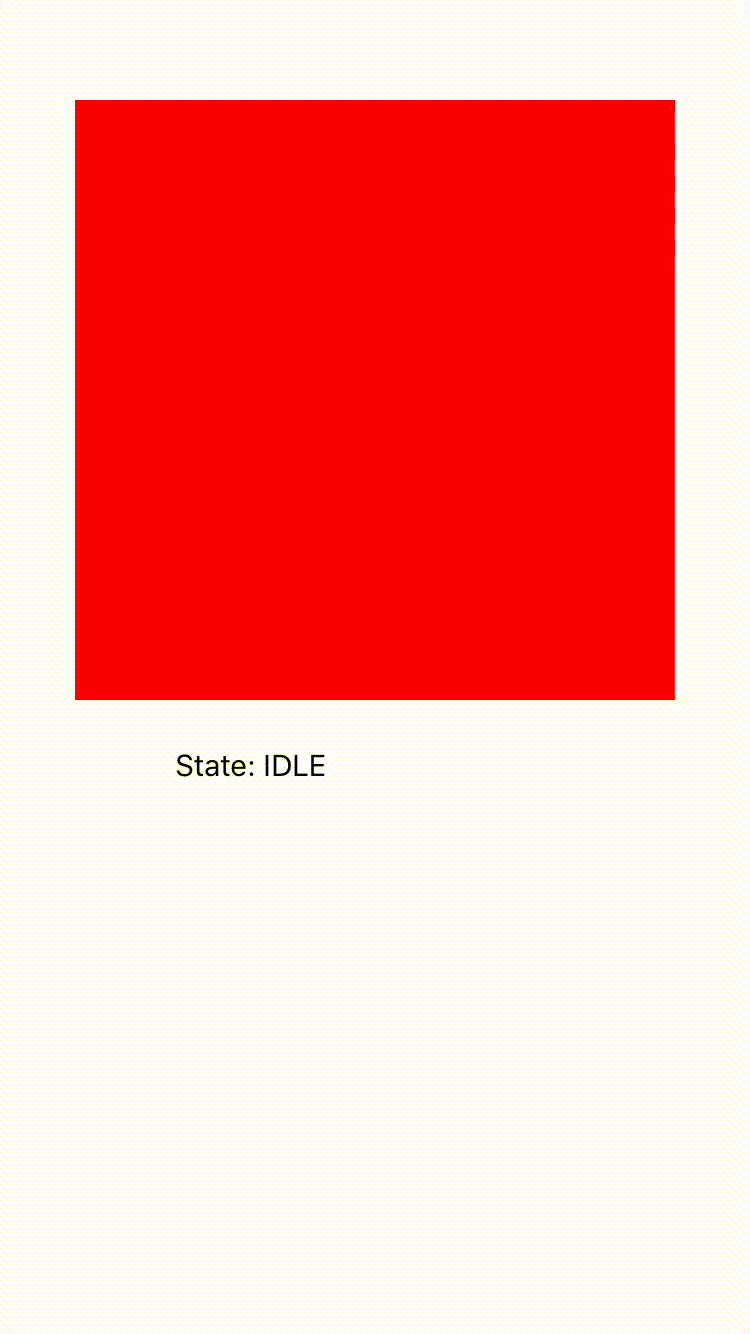
onStateChanged: (state: any): void => {
if (SwipeView.State.IDLE === state) {
this.labelState.text = "State: IDLE";
} else {
this.labelState.text = "State: DRAGGING";
}
},
});
this.addChild(this.swipeView, "swipeView", ".sf-swipeView", {
width: 300,
maxHeight: 300,
marginTop: 50,
});
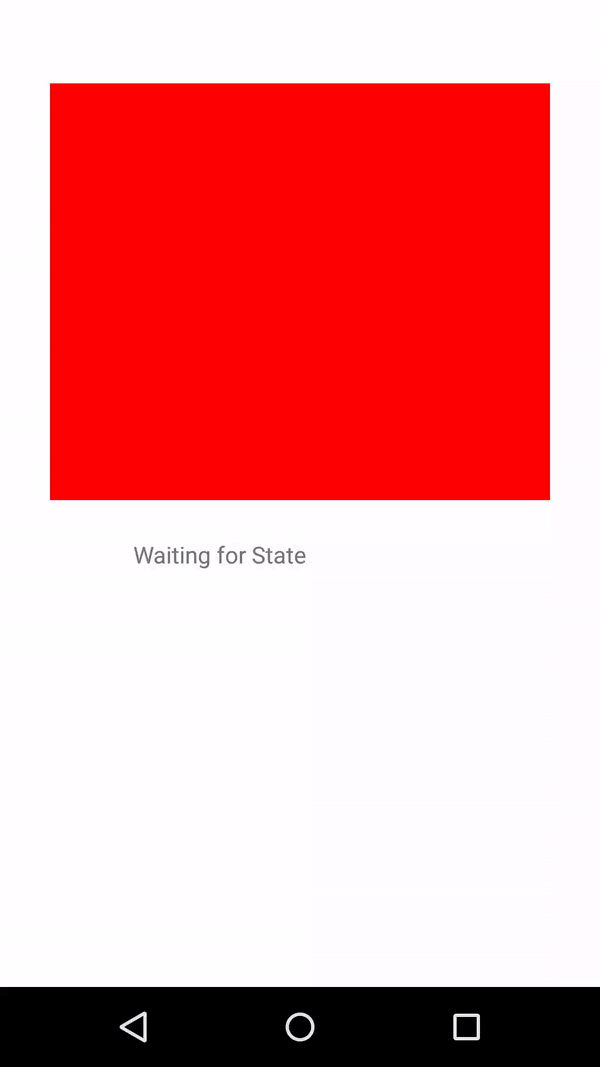
this.labelState = new StyleableLabel({
text: "Waiting for State",
});
this.addChild(this.labelState, "labelState", ".sf-label", {
width: 200,
height: 65,
});
this.dispatch({
type: "updateUserStyle",
userStyle: {
flexProps: {
flexDirection: "COLUMN",
},
},
});
}
}
import PgMessagesDesign from "generated/pages/pgMessages";
import FlexLayout from "@smartface/native/ui/flexlayout";
import Application from "@smartface/native/application";
import { Route, Router } from "@smartface/router";

//You should create new Page from UI-Editor and extend with it.
export default class Sample1 extends PgMessagesDesign {
  constructor(private router?: Router, private route?: Route) {
    super({});
  }

  // The page design has been made from the code for better
  // showcase purposes. As a best practice, remove this and
  // use WYSIWYG editor to style your pages.
  centerizeTheChildrenLayout() {
    this.dispatch({
        type: "updateUserStyle",
        userStyle: {
            flexProps: {
              flexDirection: 'ROW',
              justifyContent: 'CENTER',
              alignItems: 'CENTER'
            }
        }
    })
  }

  onShow() {
    super.onShow();
    const { headerBar } = this;
    Application.statusBar.visible = false;
    headerBar.visible = false;
  }

  onLoad() {
    super.onLoad();
    this.centerizeTheChildrenLayout();

    this.dispatch({
      type: "updateUserStyle",
      userStyle: {
        backgroundColor: "#FF0000",
      },
    });
  }
}
import PgMessagesDesign from "generated/pages/pgMessages";
import FlexLayout from "@smartface/native/ui/flexlayout";
import Application from "@smartface/native/application";
import { Route, Router } from "@smartface/router";

//You should create new Page from UI-Editor and extend with it.
export default class Sample2 extends PgMessagesDesign {
  constructor(private router?: Router, private route?: Route) {
    super({});
  }

  // The page design has been made from the code for better
  // showcase purposes. As a best practice, remove this and
  // use WYSIWYG editor to style your pages.
  centerizeTheChildrenLayout() {
    this.dispatch({
        type: "updateUserStyle",
        userStyle: {
            flexProps: {
              flexDirection: 'ROW',
              justifyContent: 'CENTER',
              alignItems: 'CENTER'
            }
        }
    })
  }

  onShow() {
    super.onShow();
    const { headerBar } = this;
    Application.statusBar.visible = false;
    headerBar.visible = false;
  }

  onLoad() {
    super.onLoad();
    this.centerizeTheChildrenLayout();

    this.dispatch({
      type: "updateUserStyle",
      userStyle: {
        backgroundColor: "#00FF00",
      },
    });
  }
}
import PgMessagesDesign from "generated/pages/pgMessages";
import FlexLayout from "@smartface/native/ui/flexlayout";
import Application from "@smartface/native/application";
import { Route, Router } from "@smartface/router";

//You should create new Page from UI-Editor and extend with it.
export default class Sample3 extends PgMessagesDesign {
  constructor(private router?: Router, private route?: Route) {
    super({});
  }

  // The page design has been made from the code for better
  // showcase purposes. As a best practice, remove this and
  // use WYSIWYG editor to style your pages.
  centerizeTheChildrenLayout() {
    this.dispatch({
        type: "updateUserStyle",
        userStyle: {
            flexProps: {
              flexDirection: 'ROW',
              justifyContent: 'CENTER',
              alignItems: 'CENTER'
            }
        }
    })
  }

  onShow() {
    super.onShow();
    const { headerBar } = this;
    Application.statusBar.visible = false;
    headerBar.visible = false;
  }

  onLoad() {
    super.onLoad();
    this.centerizeTheChildrenLayout();

    this.dispatch({
      type: "updateUserStyle",
      userStyle: {
        backgroundColor: "#0000FF",
      },
    });
  }
}
Gesture actions have performed differently in the examples. This is why swiping at left is slow.
Using with one page and component
You can show your swipe items only by one page and component at the same time.
You have to create new page from UI-Editor for the SwipeView layout.
You have to create new component for the SwipeView layout.
After that you have to add the component to the your page, and set your images to the component.
- Component
- Component UI
- Swipe Layout Page
- Swipe Layout Page UI
- Page
import System from '@smartface/native/device/system';
import FlGenericSwiperDesign from 'generated/my-components/FlGenericSwiper';
import pgGenericSwiper from 'pages/pgGenericSwiper';
import SwipeView from '@smartface/native/ui/swipeview';

export default class FlGenericSwiper extends FlGenericSwiperDesign {
  pageName?: string | undefined;
  private __images: string[];
  constructor(props?: any, pageName?: string) {
    // Initalizes super class for this scope
    super(props);
    this.pageName = pageName;
  }
  get images(): string[] {
    return this.__images;
  }
  set images(value: string[]) {
    this.__images = value;
    this.initSlider();
  }
  private initSlider() {
    this.flSwipeLayout.removeAll();
    const swipeView = new SwipeView({
      page: this,
      flexGrow: 1,
      pages: this.images.map((image: string) => pgGenericSwiper({ image })),
      onPageSelected: (index: number) => {
        console.log('index', index);
      }
    });
    this.flSwipeLayout.addChild(swipeView, 'swipeView', '.sf-swipeView');

  }
}
{
    "components": [
        {
            "className": ".sf-flexLayout",
            "id": "b8e1-0758-2348-54f2",
            "props": {
                "children": [
                    "d35a-d165-d007-5cb2"
                ],
                "name": "flGenericSwiper",
                "parent": "57f4-201f-4bfc-5fc6"
            },
            "ref": null,
            "source": {
                "page": "__library__"
            },
            "type": "FlexLayout",
            "userProps": {
                "flexProps": {},
                "height": 150,
                "left": 24.56,
                "top": 75.44
            }
        },
        {
            "className": ".sf-flexLayout",
            "id": "d35a-d165-d007-5cb2",
            "oldName": "flexLayout1",
            "props": {
                "children": [],
                "name": "flSwipeLayout",
                "parent": "b8e1-0758-2348-54f2",
                "usePageVariable": true
            },
            "ref": null,
            "source": {
                "page": "__library__"
            },
            "type": "FlexLayout",
            "userProps": {
                "flexProps": {
                    "flexGrow": 1
                },
                "height": null,
                "usePageVariable": true
            }
        }
    ]
}
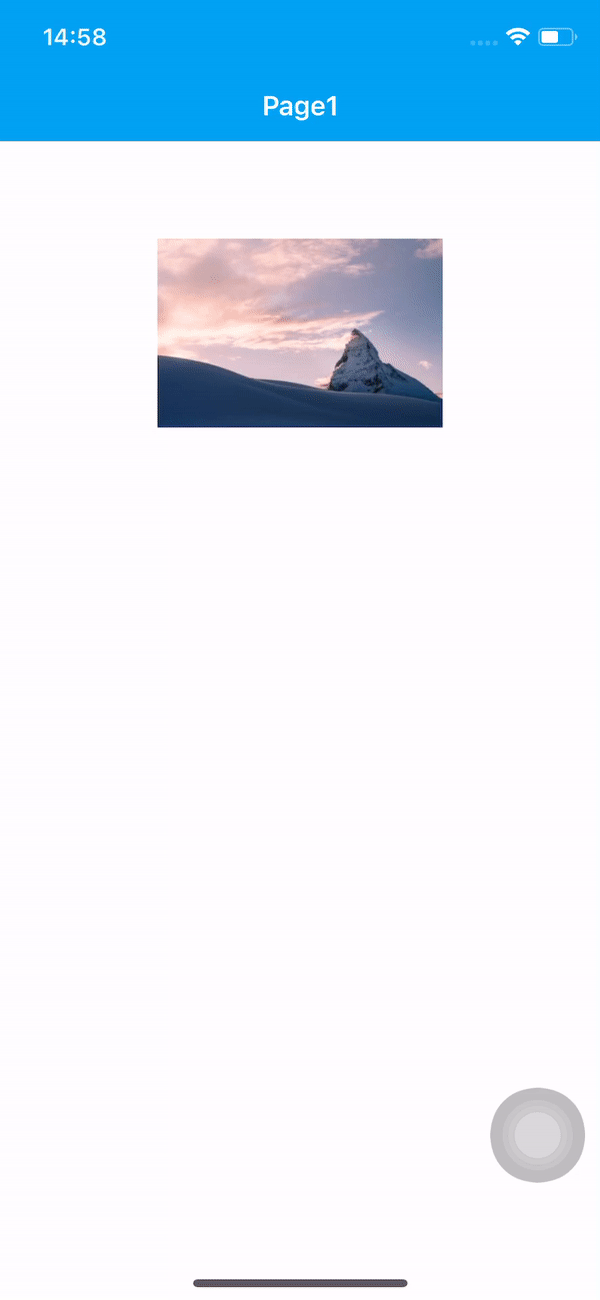
import PgGenericSwiperDesign from 'generated/pages/pgGenericSwiper';

export default function PgGenericSwiper(props) {
  return class extends PgGenericSwiperDesign {
    constructor() {
      super();
    }
    onShow() {
      super.onShow();
      const { image } = props;
      this.imgSliderItem.image = image;
    }
    onLoad() {
      super.onLoad();
    }
  };
}
{
    "components": [
        {
            "className": ".sf-page",
            "id": "40f6-5498-42c0-1e94",
            "initialized": true,
            "props": {
                "children": [
                    "bf86-aa80-bf28-0a4a",
                    "e165-461b-e799-6b9d",
                    "5733-7a0d-301a-4f7d"
                ],
                "name": "pgGenericSwiper",
                "orientation": "PORTRAIT",
                "parent": null
            },
            "type": "Page",
            "userProps": {},
            "version": "0.0.1.a",
            "degree": 0
        },
        {
            "className": ".sf-statusBar",
            "id": "bf86-aa80-bf28-0a4a",
            "props": {
                "children": [],
                "isRemovable": false,
                "name": "statusBar",
                "parent": "40f6-5498-42c0-1e94"
            },
            "type": "StatusBar",
            "userProps": {},
            "degree": 1
        },
        {
            "className": ".sf-headerBar",
            "id": "e165-461b-e799-6b9d",
            "props": {
                "children": [],
                "isRemovable": false,
                "name": "headerBar",
                "parent": "40f6-5498-42c0-1e94",
                "title": "pgGenericSwiper"
            },
            "type": "HeaderBar",
            "userProps": {
                "title": "pgGenericSwiper"
            },
            "degree": 1
        },
        {
            "className": ".sf-imageView",
            "id": "5733-7a0d-301a-4f7d",
            "oldName": "imageView1",
            "props": {
                "children": [],
                "name": "imgSliderItem",
                "parent": "40f6-5498-42c0-1e94",
                "usePageVariable": true
            },
            "ref": null,
            "type": "ImageView",
            "userProps": {
                "flexProps": {
                    "flexGrow": 1
                },
                "height": null,
                "usePageVariable": true,
                "testId": "d9m5HRQXY"
            },
            "degree": 1
        }
    ]
}
import Page1Design from 'generated/pages/page1';
import { Route, Router } from '@smartface/router';
import { withDismissAndBackButton } from '@smartface/mixins';

export default class Page1 extends withDismissAndBackButton(Page1Design) {
  private disposeables: (() => void)[] = [];
  constructor(private router?: Router, private route?: Route) {
    super({});
  }
  onShow() {
    super.onShow();
    this.flGenericSwiper.images = ['images://swiper_image_1.png', 'images://swiper_image_2.png'];
  }
  onLoad() {
    super.onLoad();
    this.headerBar.leftItemEnabled = false;
  }

  onHide(): void {
    this.dispose();
  }

  dispose(): void {
    this.disposeables.forEach((item) => item());
  }
}
Swipe Indicator
It is a very common practice to use page indicators with SwipeView. Indicators might display following feats.
- Showing active page
- Press to change active page
- Animate during the swipe
- Should not be enabled during the swipe
Consideration
Changing of the pages can be triggered from two different sources:
- User page swipe
- Indicator press
Each of them affecting each other. In order to prevent recursively circular calls, keeping track of the action is needed. To keep the track, in this example a property to the swipeView is added: indicatorScrollTriggered
Showing active page
SwipeView.onPageScrolled event can be used for indicate which page is active.
With Sliding indicator
In this case, as the swipe action is taken by the user, the indicator bar will slide accordingly following the finger movement.
swipeView.onPageScrolled = (index, offset) => {
  if (swipeView.indicatorScrollTriggered) return; //prevent circular call
  var left = (swipeView.width / PAGE_COUNT) * index + offset / PAGE_COUNT;
  if (indicator.left != left) {
    indicator.left = left;
  }
};
Indicator dot
In this case, dots are used to indicate the active page. Dot style will be changed as the page is changed.
swipeView.onPageScrolled = (index, offset) => {
  indicators.forEach((indicator, indicatorIndex) => {
    if(indicatorIndex === index)
      indicator.dispatch({
      type: "pushClassNames",
      classNames: ACTIVE_CLASS_NAME
    });
    else
      indicator.dispatch({
      type: "removeClassName",
      className: ACTIVE_CLASS_NAME
    });
  });
Changing the active swipe page
The user can press the indicators or buttons to set the "active" of the swipe page. In that case, if a sliding indicator is used, animation of the indicator has to be taken care of with checking the circular check.
import Animator from "@smartface/native/ui/animator";
import System from "@smartface/native/device/system";

swipeHeaderButton1.onPress = setActivePage.bind(page, 0);
swipeHeaderButton2.onPress = setActivePage.bind(page, 1);
swipeHeaderButton3.onPress = setActivePage.bind(page, 2);

function setActivePage(index) {
  var left = ((swipeView.width / PAGE_COUNT) * index) / PAGE_COUNT;
  var animationRootView =
    System.OS === System.OSType.IOS ? page.layout : indicator.getParent;
  if (indicator.left != left) {
    indicatorScrollTriggered = true;
    Animator.animate(animationRootView, 500, () => {
      indicator.left = left;
    }).complete(() => {
      indicatorScrollTriggered = false;
    });
  }
}
Touch Management during changes
Touches can be managed via SwipeView. onStateChanged event
swipeView.onStateChanged = (state) => {
  if (SwipeView.State.IDLE === state) {
    swipeHeaderButton1.touchEnabled =
      swipeHeaderButton2.touchEnabled =
      swipeHeaderButton3.touchEnabled =
        true;
  } else {
    swipeHeaderButton1.touchEnabled =
      swipeHeaderButton2.touchEnabled =
      swipeHeaderButton3.touchEnabled =
        false;
  }
};
Data Binding
SwipeView is using page classes to display the content. In that sense, if the pages are similar, the developer does not want to create duplicate pages. For that approach using extended pages is recommended.
The components in the example are added from the code for better showcase purposes. To learn more about the subject you can refer to:
Adding Component From CodeAs a best practice, Smartface recommends using the WYSIWYG editor in order to add components and styles to your page or library. To learn how to use UI Editor better, please refer to this documentation
UI Editor Basicsimport PageSampleDesign from "generated/pages/page3";
import { Route, Router } from "@smartface/router";
import { styleableComponentMixin } from '@smartface/styling-context';
import Application from "@smartface/native/application";
import Label from "@smartface/native/ui/label";
import SwipeView from "@smartface/native/ui/swipeview";
import PgMessagesDesign from "generated/pages/pgMessages";
class StyleableSwipeView extends styleableComponentMixin(SwipeView) {}
class StyleableLabel extends styleableComponentMixin(Label) {}
//You should create new Page from UI-Editor and extend with it.
export default class Sample extends PageSampleDesign {
swipeView: StyleableSwipeView;
labelState: StyleableLabel;
constructor(private router?: Router, private route?: Route) {
super({});
}
sampleFactory(pageIndex: number) {
return class Sample extends PgMessagesDesign {
pageIndex: number = pageIndex;
constructor() {
super({
onLoad: () => {
console.log("pageIndex" + pageIndex);
},
});
}
};
}
// The page design has been made from the code for better
// showcase purposes. As a best practice, remove this and
// use WYSIWYG editor to style your pages.
centerizeTheChildrenLayout() {
this.dispatch({
type: "updateUserStyle",
userStyle: {
flexProps: {
flexDirection: 'ROW',
justifyContent: 'CENTER',
alignItems: 'CENTER'
}
}
})
}
onShow() {
super.onShow();
const { headerBar } = this;
Application.statusBar.visible = false;
headerBar.visible = false;
}
onLoad() {
super.onLoad();
this.centerizeTheChildrenLayout();
this.swipeView = new StyleableSwipeView({
page: this,
pages: [
this.sampleFactory(0),
this.sampleFactory(2),
this.sampleFactory(3),
],
onStateChanged: (state: any): void => {
if (SwipeView.State.IDLE === state) {
this.labelState.text = "State: IDLE";
} else {
this.labelState.text = "State: DRAGGING";
}
},
});
this.addChild(this.swipeView, "swipeView", ".sf-swipeView", {
width: 300,
maxHeight: 300,
marginTop: 50,
});
this.labelState = new StyleableLabel({
text: "Waiting for State",
});
this.addChild(this.labelState, "labelState", ".sf-label", {
width: 200,
height: 65,
});
this.dispatch({
type: "updateUserStyle",
userStyle: {
flexProps: {
flexDirection: "COLUMN",
},
},
});
}
}
Pushing data to the swipe page from outside
There is no interaction or relation between the swipe page instances and the swipeView. If a data updates on the main page, swipe pages can be via several ways
Update via shared state management
A separate state module JS code can be created. We recommend using redux for state management. Both the main page and the swipe pages are going to subscribe to same state manager. This is helpful when the main page is a singleton and no other routes are created for it.
The components in the example are added from the code for better showcase purposes. To learn more about the subject you can refer to:
Adding Component From CodeAs a best practice, Smartface recommends using the WYSIWYG editor in order to add components and styles to your page or library. To learn how to use UI Editor better, please refer to this documentation
UI Editor Basics- Main Page
- Swipe Page 1
- Swipe Page 2
import PageSampleDesign from "generated/pages/pageSample";
import { Route, Router } from "@smartface/router";
import { styleableComponentMixin } from '@smartface/styling-context';
import Application from "@smartface/native/application";
import SwipeView from "@smartface/native/ui/swipeview";
import SwipePage1 from "swipePage1";
import SwipePage2 from "swipePage2";
import SwipePage3 from "swipePage3";
import stateStore from "stateStore";
import Button from "@smartface/native/ui/button";

class StyleableSwipeView extends styleableComponentMixin(SwipeView) {}
class StyleableButton extends styleableComponentMixin(Button) {}


//You should create new Page from UI-Editor and extend with it.
export default class Sample extends PageSampleDesign {
    swipeView: StyleableSwipeView;
    btn: StyleableButton
  constructor(private router?: Router, private route?: Route) {
    super({});
  }

  // The page design has been made from the code for better
  // showcase purposes. As a best practice, remove this and
  // use WYSIWYG editor to style your pages.
  centerizeTheChildrenLayout() {
    this.dispatch({
        type: "updateUserStyle",
        userStyle: {
            flexProps: {
              flexDirection: 'ROW',
              justifyContent: 'CENTER',
              alignItems: 'CENTER'
            }
        }
    })
  }

  onShow() {
    super.onShow();
    const { headerBar } = this;
    Application.statusBar.visible = false;
    headerBar.visible = false;
  }

  onLoad() {
    super.onLoad();
    this.centerizeTheChildrenLayout();

    this.swipeView = new StyleableSwipeView({
        page: this,
        pages: [SwipePage1, SwipePage2, SwipePage3],
      });

      this.addChild(this.swipeView, "swipeView", ".sf-swipeView", {
        width: 300,
        maxHeight: 300,
        marginTop: 50,
      });

      stateStore.subscribe(function (action) {
        let state = stateStore.getState();
        // Do logic
      });

      this.btn = new StyleableButton({
        text: "Save State",
        onPress: () => {
          stateStore.dispatch({
            type: "Update From Main",
            action: "logic",
          });
        },
      });
      this.addChild(this.btn, "btn", ".sf-button", {
        width: 200,
        height: 65,
      });

      this.dispatch({
        type: "updateUserStyle",
        userStyle: {
          flexProps: {
            flexDirection: "COLUMN",
          },
        },
      });
  }
}
import PgMessagesDesign from "generated/pages/pgMessages";
import FlexLayout from "@smartface/native/ui/flexlayout";
import Application from "@smartface/native/application";
import { Route, Router } from "@smartface/router";
import stateStore from "stateStore";

//You should create new Page from UI-Editor and extend with it.
export default class Sample1 extends PgMessagesDesign {
  constructor(private router?: Router, private route?: Route) {
    super({});
  }

  // The page design has been made from the code for better
  // showcase purposes. As a best practice, remove this and
  // use WYSIWYG editor to style your pages.
  centerizeTheChildrenLayout() {
    this.dispatch({
        type: "updateUserStyle",
        userStyle: {
            flexProps: {
              flexDirection: 'ROW',
              justifyContent: 'CENTER',
              alignItems: 'CENTER'
            }
        }
    })
  }

  onShow() {
    super.onShow();
    const { headerBar } = this;
    Application.statusBar.visible = false;
    headerBar.visible = false;
  }

  onLoad() {
    super.onLoad();
    this.centerizeTheChildrenLayout();

    stateStore.subscribe(function (action) {
        let state = stateStore.getState();
        // Do logic
      });


    this.dispatch({
      type: "updateUserStyle",
      userStyle: {
        backgroundColor: "#FF0000",
      },
    });
  }
}
import PgMessagesDesign from "generated/pages/pgMessages";
import FlexLayout from "@smartface/native/ui/flexlayout";
import Application from "@smartface/native/application";
import { Route, Router } from "@smartface/router";
import stateStore from "stateStore";

//You should create new Page from UI-Editor and extend with it.
export default class Sample1 extends PgMessagesDesign {
  constructor(private router?: Router, private route?: Route) {
    super({});
  }

  // The page design has been made from the code for better
  // showcase purposes. As a best practice, remove this and
  // use WYSIWYG editor to style your pages.
  centerizeTheChildrenLayout() {
    this.dispatch({
        type: "updateUserStyle",
        userStyle: {
            flexProps: {
              flexDirection: 'ROW',
              justifyContent: 'CENTER',
              alignItems: 'CENTER'
            }
        }
    })
  }

  onShow() {
    super.onShow();
    const { headerBar } = this;
    Application.statusBar.visible = false;
    headerBar.visible = false;
  }

  onLoad() {
    super.onLoad();
    this.centerizeTheChildrenLayout();

    stateStore.subscribe(function (action) {
        let state = stateStore.getState();
        // Do logic
      });


      this.btn = new Button({
        text: "Save State",
        onPress: () => {
          stateStore.dispatch({
            type: "Update From Main",
            action: "logic",
          });
        },
      });
      this.addChild(this.btn, "btn", ".sf-button", {
        width: 200,
        height: 65,
      });

      this.dispatch({
        type: "updateUserStyle",
        userStyle: {
          backgroundColor: "#00FF00",
        },
      });
  }
}
Pass the main page instance
This is quite similar to passing the index to the swipe page. In this case, in addition to the index, main page instance is passed too.
The components in the example are added from the code for better showcase purposes. To learn more about the subject you can refer to:
Adding Component From CodeAs a best practice, Smartface recommends using the WYSIWYG editor in order to add components and styles to your page or library. To learn how to use UI Editor better, please refer to this documentation
UI Editor Basicsimport PageSampleDesign from "generated/pages/pageSample";
import { Route, Router } from "@smartface/router";
import { styleableComponentMixin } from '@smartface/styling-context';
import Application from "@smartface/native/application";
import SwipeView from "@smartface/native/ui/swipeview";
import Label from "@smartface/native/ui/label";
import PgMessagesDesign from "generated/pages/pgMessages";
import Page from "@smartface/native/ui/page";
class StyleableSwipeView extends styleableComponentMixin(SwipeView) {}
class StyleableLabel extends styleableComponentMixin(Label) {}
//You should create new Page from UI-Editor and extend with it.
export default class Sample extends PageSampleDesign {
swipeView: StyleableSwipeView;
labelState: StyleableLabel;
constructor(private router?: Router, private route?: Route) {
super({});
}
sampleFactory(pageIndex: number, pageInstance: Page) {
return class Sample extends PgMessagesDesign {
pageIndex: number = pageIndex;
pageInstance: Page = pageInstance;
constructor() {
super({
onLoad: () => {
console.log("pageIndex" + pageIndex);
},
});
}
};
}
// The page design has been made from the code for better
// showcase purposes. As a best practice, remove this and
// use WYSIWYG editor to style your pages.
centerizeTheChildrenLayout() {
this.dispatch({
type: "updateUserStyle",
userStyle: {
flexProps: {
flexDirection: 'ROW',
justifyContent: 'CENTER',
alignItems: 'CENTER'
}
}
})
}
onShow() {
super.onShow();
const { headerBar } = this;
Application.statusBar.visible = false;
headerBar.visible = false;
}
onLoad() {
super.onLoad();
this.centerizeTheChildrenLayout();
this.swipeView = new SwipeView({
page: this,
pages: [
this.sampleFactory(0, this),
this.sampleFactory(2, this),
this.sampleFactory(3, this),
],
onStateChanged: (state: any): void => {
if (SwipeView.State.IDLE === state) {
this.labelState.text = "State: IDLE";
} else {
this.labelState.text = "State: DRAGGING";
}
},
});
this.addChild(this.swipeView, "swipeView", ".sf-swipeView", {
width: 300,
maxHeight: 300,
marginTop: 50,
});
this.labelState = new Label({
text: "Waiting for State",
});
this.addChild(this.labelState, "labelState", ".sf-label", {
width: 200,
height: 65,
});
this.dispatch({
type: "updateUserStyle",
userStyle: {
flexProps: {
flexDirection: "COLUMN",
},
},
});
}
}
Performance
SwipeView is a heavy component. It is performing low (especially on Android) when the number swipe pages are high. Try to limit the number of pages below 20, bellow 15 is better.
In order to change the number of pages, assignment of the pages property of the swipeView is required. This is causing recreating all of the swipe pages (again).