Building Smartface Apps Locally
Smartface recommends to use Appcircle for building your mobile app unless you have a specific use case.
How to Build Apps Locally with Smartface CLI
You can generate Smartface iOS and Android binaries in your local environment. For the Android builds, you can use Linux or macOS. For iOS builds, macOS is required.
To install Smartface CLI, refer to this document:
Smartface Command Line InterfaceGenerating platform-based native projects from the Smartface IDE
You can use the following shell commands to export your Smartface project as Xcode and Android Studio projects:
// Generate Android Studio Project
npx smfc --task=export:Android --projectRoot=$WORKSPACE_FOLDER --tempFolder=$TEMP_FOLDER

// Generate Xcode Project
npx smfc --task=export:iOS --projectRoot=$WORKSPACE_FOLDER --outputZip=$OUTPUT_ZIP_FILE
$TEMP_FOLDER is a temporary folder where the generated project files will be stored.
$WORKSPACE_FOLDER is the folder where your Smartface project is located.
$OUTPUT_ZIP_FILE is the path to the generated zip file.
Requirements for iOS Builds
The build be run in a compatible Xcode version due to framework dependencies. Please check the xcodeversion file under the output folder to find out the Xcode version compatible with your project.
- install xcode 11 or later (xcode 13 recommended)
Build Steps for iOS
After the completion of the prerequisites and the installation of the Smartface CLI, you can build your iOS project.
npx smfc use YOUR_PLAYER_VERSIO --os IOS
You can use latest command to get the latest version of Smartface Player.
npx smfc use latest --os IOS
npx smfc --task=export:IOS --projectRoot="/yourPath/toProject/rootFiles" --tempFolder="/yourPath/toTemp/folder" --outputFolder="/yourPath/toOutput/folder"

After that, you can build your iOS project on Xcode and run it on your device. 🥳
You have to create code signing certificates for your iOS project to sign your app.
https://developer.apple.com/support/code-signing/
Requirements for Android Builds
Prerequisites:
- install JDK 11 or later and set JAVA_HOME
- install android sdk (go to command line tools only section) and then set ANDROID_HOME
- android-ndk-r19c and then set ANDROID_NDK_HOME
- install make
For SDK and NDK, you can use the following documentation to how to install them:
https://developer.android.com/studio/projects/install-ndk
Please make sure that the environment variables are set correctly:
javac -v
echo $ANDROID_HOME
echo $ANDROID_NDK_HOME
Build Steps for Android
After the completion of the prerequisites and the installation of the Smartface CLI, you can generate APK files in your local environment.
Generate Android Studio Project
npx smfc use YOUR_PLAYER_VERSION --os Android
You can use latest command to get the latest version of Smartface Player.
npx smfc use latest --os Android
npx smfc --task=export:Android --projectRoot="/yourPath/toProject/rootFiles" --tempFolder="/yourPath/toTemp/folder" --outputFolder="/yourPath/toOutput/folder"
After the completion of the project generation, you can build the APK files.
- Navigate to gradlew folder
cd YOUR_TEMP_FOLDER/SmartfaceAndroid
- Build APK file
- module: app
- variant: playerProdRelease
./gradlew app:assemblePlayerProdRelease
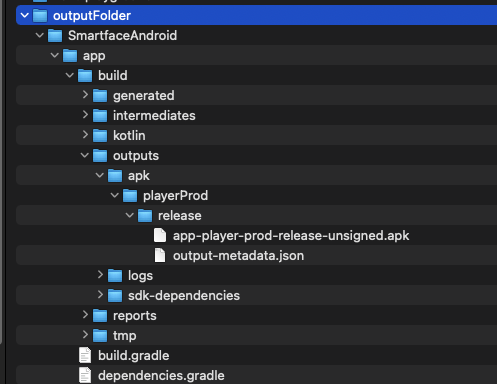
After the completion of the build, you can find the APK file in app/build/outputs/apk/playerProd/release folder named app-player-prod-release-unsigned.apk.

- After that you can sign the APK file with your own certificate.
apksigner sign --ks ~/.android/debug.keystore --out app-player-prod-release-signed.apk app/build/outputs/apk/playerProd/release/app-player-prod-release-unsigned.apk
You can find your keystore file in ~/.android/debug.keystore and the password is android.
If you cant find your keystore file, you can create one by following the steps below:
keytool -genkey -v -keystore debug.keystore -alias androiddebugkey -storepass android -keypass android -keyalg RSA -validity 14000
And your signed APK file will be generated in SmartfaceAndroid folder named app-player-prod-release-signed.apk. 🥳