Font
Overview
API Reference: UI.Font
Font is used to assign text properties to UI objects. The font property is a shorthand for font-style, font-size and font-family .
The components in the example are added from the code for better showcase purposes. To learn more about the subject you can refer to:
Adding Component From CodeAs a best practice, Smartface recommends using the WYSIWYG editor in order to add components and styles to your page or library. To learn how to use UI Editor better, please refer to this documentation
UI Editor Basicsimport PageSampleDesign from "generated/pages/pageSample";
import Application from "@smartface/native/application";
import System from "@smartface/native/device/system";
import Label from "@smartface/native/ui/label";
import { Route, Router } from "@smartface/router";
import { withDismissAndBackButton } from "@smartface/mixins";
import { styleableComponentMixin } from "@smartface/styling-context";
class StyleableLabel extends styleableComponentMixin(Label) {}
//You should create new Page from UI-Editor and extend with it.
export default class Sample extends withDismissAndBackButton(PageSampleDesign) {
myLabel: StyleableLabel;
myLabel2: StyleableLabel;
myLabel3: StyleableLabel;
constructor(private router?: Router, private route?: Route) {
super({});
}
// The page design has been made from the code for better
// showcase purposes. As a best practice, remove this and
// use WYSIWYG editor to style your pages.
centerizeTheChildrenLayout() {
this.style.apply({
flexProps: {
flexDirection: "COLUMN",
justifyContent: "CENTER",
alignItems: "CENTER",
},
});
}
onShow() {
super.OnShow();
const { headerBar } =
System.OS === System.OSType.ANDROID ? this : this.parentController;
Application.statusBar.visible = false;
headerBar.visible = false;
}
onLoad() {
super.onLoad();
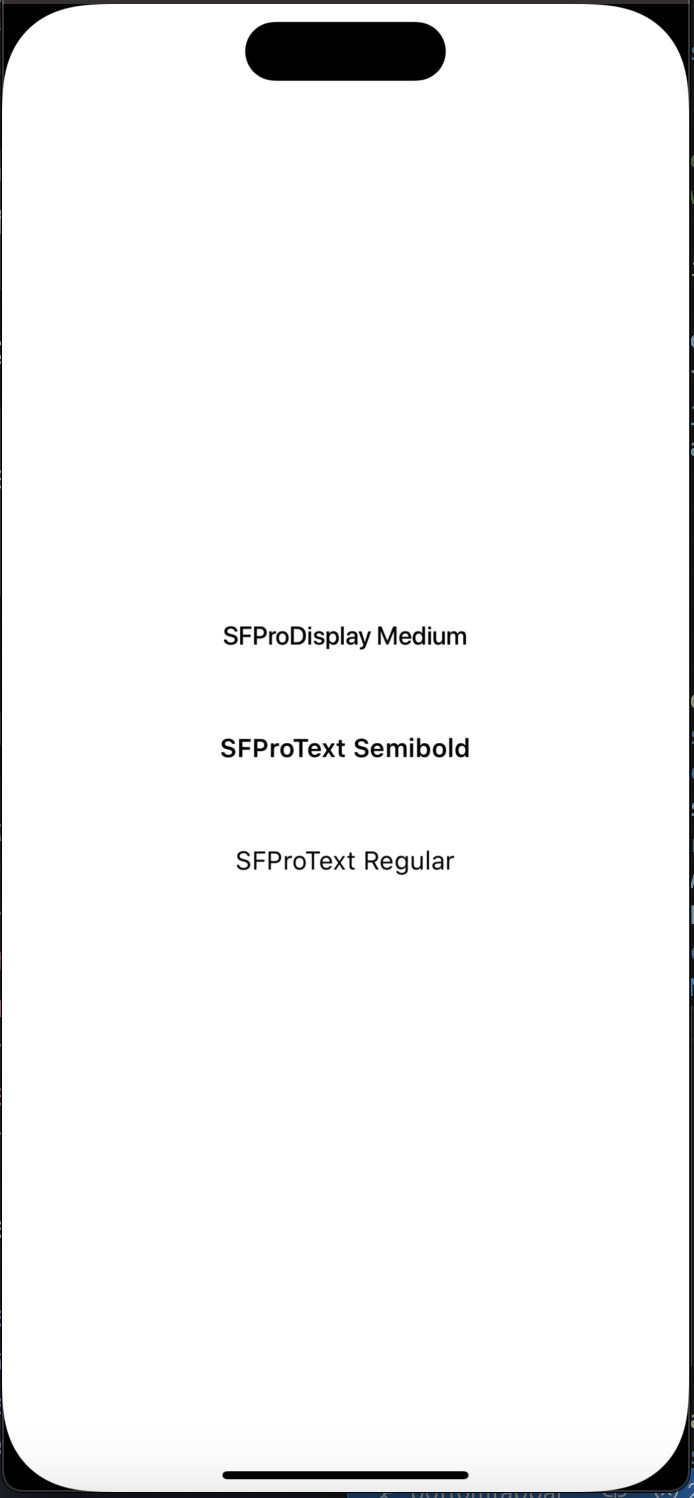
this.myLabel = new StyleableLabel({
text: "SFProDisplay Medium ",
});
this.addChild(this.myLabel, "myLabel", ".label", {
width: 250,
height: 60,
marginBottom: 10,
textAlignment: "MIDCENTER",
textColor: "#000000",
font: {
size: 16,
family: "SFProDisplay",
style: "Medium",
},
});
this.myLabel2 = new StyleableLabel({
text: "SFProText Semibold",
});
this.addChild(this.myLabel2, "myLabel2", ".label", {
width: 250,
height: 60,
marginBottom: 10,
textAlignment: "MIDCENTER",
textColor: "#000000",
font: {
size: 16,
family: "SFProText",
style: "Semibold",
},
});
this.myLabel3 = new StyleableLabel({
text: "SFProText Regular",
});
this.addChild(this.myLabel3, "myLabel3", ".label", {
width: 250,
height: 60,
textAlignment: "MIDCENTER",
textColor: "#000000",
font: {
size: 16,
family: "SFProText",
style: "Regular",
},
});
}
}
The "Default" Font
Android & iOS systems are using different fonts by default.
- iOS uses San Francisco font by default
- Android uses Roboto as the default font
There is an option to state "use the default font". Which means, useSan Franciscoon iOS and useRobotoon Android.
A component that has a text property such as Label can have dynamic width & height regarding the text & font properties.
How to Install Custom Fonts?
Installing custom fonts is quick and easy.
Only TrueType Fonts (ttf) are supported
Steps to add font
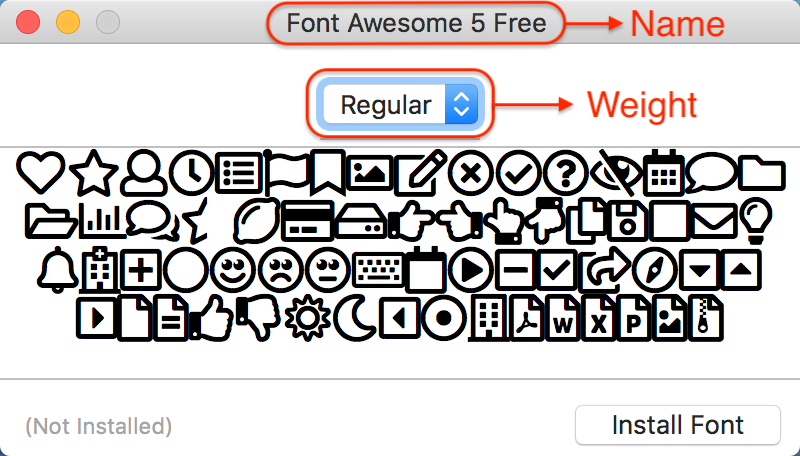
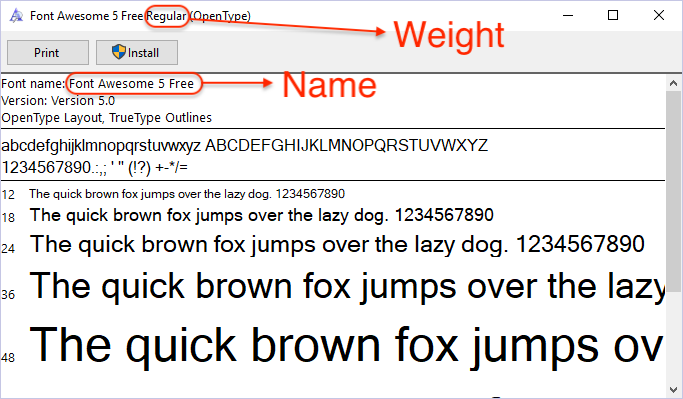
- Get the full font name from the system
Mac
Windows
- Create a folder for the font name. Remove all space characters
- Rename your font file based on the
FontName-FontWeight.ttf pattern; Remove all of the space characters - Upload your font files with drag & drop into font folder that you have just created.
Some font names can cause problems with iOS. As you can see in the picture above, some font names do not match the pattern. It is commonly seen with the fonts Foundry name within.
If this is happening, try with the pattern as seen in the picture above.
On iOS, font name that system recognizes must have the folder name and font name. Otherwise related text won't have desired font family. You can get all font names by running the following code.
The code below will give the font names installed in the App & the System (iOS only).
import Font from "@smartface/native/ui/font";

let fontNames = Font.ios.allFontNames();
for (const index in fontNames) {
  console.log(fontNames[index]);
}
Using Fonts Remotely
It is possible to download a font file from url and using this font for all components. To create this font from a file, path is must be known with getAbsolutePath().
The components in the example are added from the code for better showcase purposes. To learn more about the subject you can refer to:
Adding Component From CodeAs a best practice, Smartface recommends using the WYSIWYG editor in order to add components and styles to your page or library. To learn how to use UI Editor better, please refer to this documentation
UI Editor Basicsimport PageSampleDesign from "generated/pages/pageSample";
import Application from "@smartface/native/application";
import System from "@smartface/native/device/system";
import Font from "@smartface/native/ui/font";
import Label from "@smartface/native/ui/label";
import Button from "@smartface/native/ui/button";
import TextView from "@smartface/native/ui/textview";
import TextBox from "@smartface/native/ui/textbox";
import Http from "@smartface/native/net/http";
import { Route, Router } from "@smartface/router";
import { withDismissAndBackButton } from "@smartface/mixins";
import { styleableComponentMixin } from "@smartface/styling-context";
class StyleableLabel extends styleableComponentMixin(Label) {}
class StyleableButton extends styleableComponentMixin(Button) {}
class StyleableTextView extends styleableComponentMixin(TextView) {}
class StyleableTextBox extends styleableComponentMixin(TextBox) {}
export default class Sample extends withDismissAndBackButton(PageSampleDesign) {
myLabel: StyleableLabel;
myButton: StyleableButton;
myTextview: StyleableTextView;
myTextBox: StyleableTextBox;
constructor(private router?: Router, private route?: Route) {
super({});
}
// The page design has been made from the code for better
// showcase purposes. As a best practice, remove this and
// use WYSIWYG editor to style your pages.
centerizeTheChildrenLayout() {
this.style.apply({
flexProps: {
flexDirection: "COLUMN",
justifyContent: "CENTER",
alignItems: "CENTER",
},
});
}
onShow() {
super.onShow();
const { headerBar } =
System.OS === System.OSType.ANDROID ? this : this.parentController;
Application.statusBar.visible = false;
headerBar.visible = false;
const sessionManager = new Http();
sessionManager.requestFile({
url: "https://newcdnsmartface.blob.core.windows.net/docs/WindSong-Regular.ttf",
fileName: "Windsong.ttf",
method: "GET",
onLoad: (e): void => {
const file = e.file;
if (file.exists) {
console.log("file exists.");
}
console.log("Moving...");
console.log("e.file.fullPath: " + e.file.getAbsolutePath());
this.myLabel.font = Font.createFromFile(e.file.getAbsolutePath(), 16);
this.myButton.font = Font.createFromFile(e.file.getAbsolutePath(), 16);
this.myTextview.font = Font.createFromFile(
e.file.getAbsolutePath(),
16
);
this.myTextBox.font = Font.createFromFile(e.file.getAbsolutePath(), 16);
},
onError: (e: any) => {
console.log("Something Wrong", e);
},
});
}
onLoad() {
super.onLoad();
this.myLabel = new StyleableLabel({
text: "Label",
});
this.myButton = new StyleableButton({
text: "Button",
});
this.myTextview = new StyleableTextView({
text: "TextView",
});
this.myTextBox = new StyleableTextBox({
text: "TextBox",
});
this.addChild(this.myTextBox, "myTextBox", ".textBox", {
height: 60,
width: 100,
borderWidth: 0.5,
marginBottom: 10,
textAlignment: "MIDCENTER",
});
this.addChild(this.myLabel, "myLabel", ".label", {
width: 150,
height: 60,
marginBottom: 10,
textAlignment: "MIDCENTER",
});
this.addChild(this.myButton, "myButton", ".button", {
width: 150,
height: 60,
marginBottom: 10,
});
this.addChild(this.myTextview, "myTextView", ".textView", {
height: 60,
width: 150,
textAlignment: "MIDCENTER",
marginBottom: 10,
});
}
}
Using System Fonts
In order to use the system fonts (The ones that are shipped by the system, not bundled within the app) it is possible to use with code. UI editor does not support unknown font names, which are not added to the project.
While creating the font using create(fontName,size) that might work on the system that you are testing, but might not work with another. In that case, the system will assign a different font.
Create Font Catalog
In best case, you can create a font catalog using the following code.
- Catalog
- Page
{
  ".homePage": {
    ".titles": {
      "font": {
        "family": "Default",
        "size": 30,
        "style": "Italic",
        "bold": false,
        "italic": true
      },
      "textColor": "rgba( 0, 0, 0, 1)",
      "backgroundColor": "rgba( 255, 255, 255, 0 )",
      "textAlignment": "MIDCENTER"
    }
  }
}
import Page1Design from "generated/pages/page1";
import Application from "@smartface/native/application";
import System from "@smartface/native/device/system";
import Label from "@smartface/native/ui/label";
import { Route, Router } from "@smartface/router";
import { styleableComponentMixin } from "@smartface/styling-context";
import { withDismissAndBackButton } from "@smartface/mixins";
class StyleableLabel extends styleableComponentMixin(Label) {}
export default class Page1 extends withDismissAndBackButton(Page1Design) {
myLabel: StyleableLabel;
constructor(private router?: Router, private route?: Route) {
super({});
}
// The page design has been made from the code for better
// showcase purposes. As a best practice, remove this and
// use WYSIWYG editor to style your pages.
centerizeTheChildrenLayout() {
this.style.apply({
flexProps: {
flexDirection: "COLUMN",
justifyContent: "CENTER",
alignItems: "CENTER",
},
});
}
onShow() {
super.onShow();
const { headerBar } =
System.OS === System.OSType.ANDROID ? this : this.parentController;
Application.statusBar.visible = false;
headerBar.visible = false;
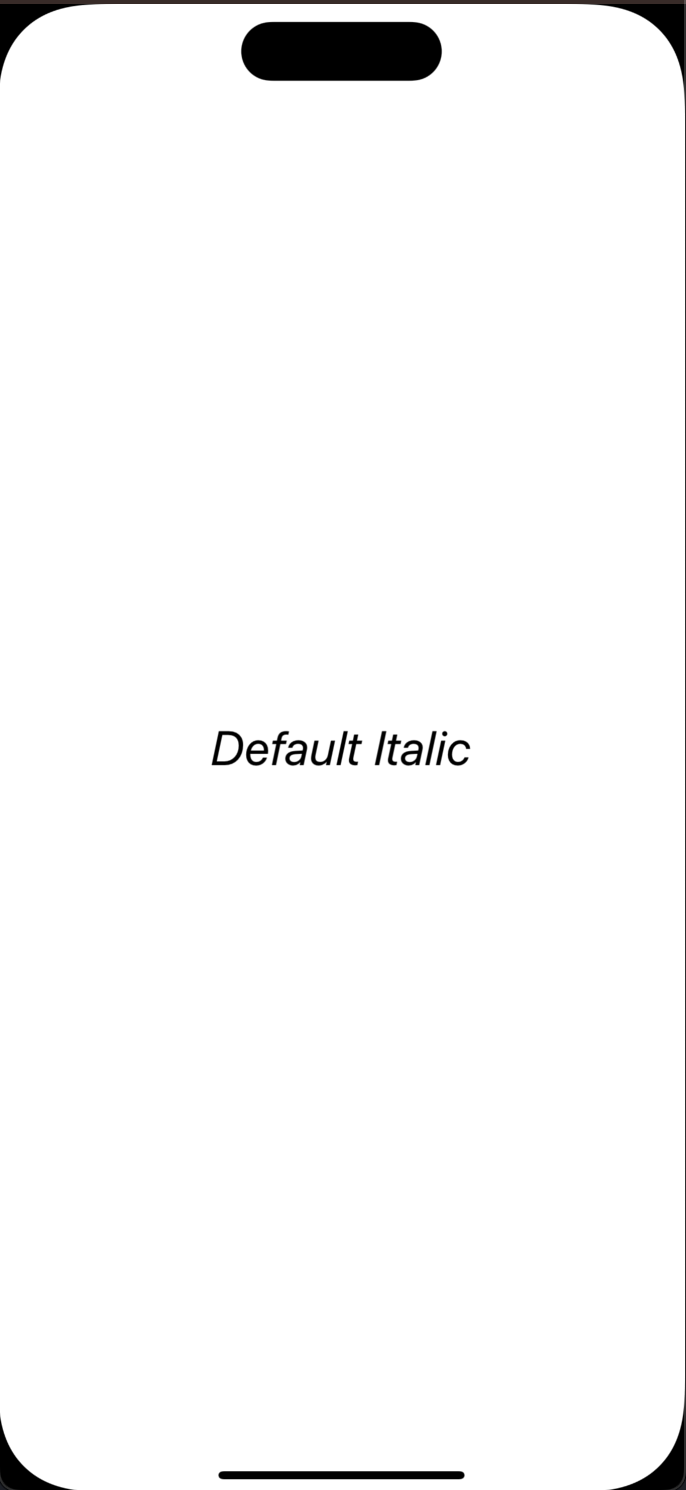
this.myLabel = new StyleableLabel({
text: "Default Italic",
});
this.addChild(this.myLabel, "myLabel", ".label");
this.myLabel.style.addClass(".homePage.titles");
}
onLoad() {
super.onLoad();
this.centerizeTheChildrenLayout();
}
}
What are the Icon Fonts?
Icon fonts are just fonts. However, instead of containing letters or numbers, they contain symbols and glyphs. Smartface UI Editor & Framework make it possible to use icon fonts within your project.
Custom fonts can be added under config/Fonts folder.
Font Awesome
If you don't have Font Awesome installed on your workspace, please perform following steps:
- Download FontAwesome package from here
- Upload related .ttf file under config/Fonts/FontAwesome and rename it as FontAwesome.ttf
- After properties panel recognizes your new font, it will show up as a new option on font family selection
- Create a component that has an input
- Choose FontAwesome as font family from properties panel
- Decide which character to show from here
- Click related area to copy the icon and then paste it into your component
Ico Moon
Ico Moon provides icon management tool and icon libraries. It has a free version as well. To try it, please perform following steps:
- Upload IcoMoon-Free.ttf to config/Fonts/IcoMoon-Free
- For free icons visit here
- Select an icon then click Generate Font
- Click Get Code and then copy character
- Then you can use it anywhere
Using Font Glyphs in IDE
You can use font glyphs in IDE by using the following steps:
- Create a component that has an input
- Choose font family from themes panel
- Open Font Glyphs panel from the right side of the IDE
- Select icon from the list
- Click related area to copy the icon and then paste it into your component